Сделать кнопку UIAlertView триггерной функцией при нажатии
В настоящее время я использую следующий код для представления UIAlertView:
UIAlertView *alert = [[UIAlertView alloc] initWithTitle:@"Today's Entry Complete"
                        message:@"Press OK to submit your data!"
                       delegate:nil
              cancelButtonTitle:@"OK"
              otherButtonTitles: nil];
    [alert show];
    [alert release];
Как сделать так, чтобы при нажатии кнопки " OK " запускалась функция, скажем -(void)submitData
7 ответов:
Примечание:
Важно: UIAlertView устарел в iOS 8. (Обратите внимание, что UIAlertViewDelegate также не рекомендуется.) Для создания и управления оповещениями в iOS 8 и более поздних версиях вместо этого используйте UIAlertController с предпочтительным стилем UIAlertControllerStyleAlert.
Пожалуйста, проверьте этот учебник
Objectvie C
.H file
@interface urViewController : UIViewController <UIAlertViewDelegate> {.m file
// Create Alert and set the delegate to listen events
UIAlertView *alert = [[UIAlertView alloc] initWithTitle:@"Today's Entry Complete"
                                                message:@"Press OK to submit your data!"
                                               delegate:self
                                      cancelButtonTitle:nil
                                      otherButtonTitles:@"OK", nil];

// Set the tag to alert unique among the other alerts.
// So that you can find out later, which alert we are handling
alert.tag = 100;

[alert show];


//[alert release];


-(void) alertView:(UIAlertView *)alertView clickedButtonAtIndex:(NSInteger)buttonIndex{


    // Is this my Alert View?
    if (alertView.tag == 100) {
        //Yes


    // You need to compare 'buttonIndex' & 0 to other value(1,2,3) if u have more buttons.
    // Then u can check which button was pressed.
        if (buttonIndex == 0) {// 1st Other Button

            [self submitData];

        }
        else if (buttonIndex == 1) {// 2nd Other Button


        }

    }
    else {
     //No
        // Other Alert View

    }

}
Swift
Самый быстрый способ-использовать новый UIAlertController и замыкания:
    // Create the alert controller
    let alertController = UIAlertController(title: "Title", message: "Message", preferredStyle: .Alert)

    // Create the actions
    let okAction = UIAlertAction(title: "OK", style: UIAlertActionStyle.Default) {
        UIAlertAction in
        NSLog("OK Pressed")
    }
    let cancelAction = UIAlertAction(title: "Cancel", style: UIAlertActionStyle.Cancel) {
        UIAlertAction in
        NSLog("Cancel Pressed")
    }

    // Add the actions
    alertController.addAction(okAction)
    alertController.addAction(cancelAction)

    // Present the controller
    self.presentViewController(alertController, animated: true, completion: nil)
Если вы используете несколько экземпляров UIAlertView, которые не объявлены в интерфейсе класса, вы также можете установить тег для идентификации экземпляров в методе делегата, например:
Где-то в верхней части файла класса myClass.m
#define myAlertViewsTag 0Создание UIAlertView:
UIAlertView *alert = [[UIAlertView alloc] initWithTitle:@"My Alert"
    message:@"please press ok or cancel"
    delegate:self
    cancelButtonTitle:@"Cancel"
    otherButtonTitles:@"OK", nil];
alert.tag = myAlertViewsTag;
[alert show];
[alert release];
Метод делегата:
-(void)alertView:(UIAlertView *)alertView didDismissWithButtonIndex:(NSInteger)buttonIndex {
    if (alertView.tag == myAlertViewsTag) {
        if (buttonIndex == 0) {
            // Do something when cancel pressed
        } else {
            // Do something for ok
        }
    } else {
        // Do something with responses from other alertViews
    }
}
Вам нужно задать делегат при выделении alertview, а затем использовать один из методов UIAlertViewDelegate для вызова собственного метода, например:
UIAlertView *alert = [[UIAlertView alloc] initWithTitle:@"Today's Entry Complete"
                                                message:@"Press OK to submit your data!"
                                               delegate:self
                                      cancelButtonTitle:@"OK"
                                      otherButtonTitles:nil];
[alert show];
[alert release];

- (void)alertView:(UIAlertView *)alertView didDismissWithButtonIndex:(NSInteger)buttonIndex
{
    [self submitData];
}
Вам нужно настроить
delegateдля вашегоUIAlertView, прежде чем показывать его. Затем выполните работу в обратном вызове делегата как таковой:-(void)alertView:(UIAlertView*)alert didDismissWithButtonIndex:(NSInteger)buttonIndex; { if ([[alert buttonTitleAtIndex] isEqualToString:@"Do it"]) { // Code to execute on Do it button selection. } }Мой проект CWUIKit на https://github.com/Jayway/CWUIKit имеет дополнение к
UIAlertView, которое позволяет делать то же самое, но с блоками. Повторное использование одной и той же операции для создания, отображения и обработки предупреждения об этом:[[UIAlertView alertViewWithTitle:@"My Title" message:@"The Message" cancelButtonTitle:@"Cancel" otherTitlesAndAuxiliaryActions:@"Do it", ^(CWAuxiliaryAction*a) { // Code to execute on Do it button selection. }, nil] show];
Если вы хотите использовать блоки, вы также можете использовать MKAdditions, Чтобы легко достичь этого даже для нескольких UIAlertViews.
Просто используйте код, подобный этому образцу:
[[UIAlertView alertViewWithTitle:@"Test"
                        message:@"Hello World"
              cancelButtonTitle:@"Dismiss"
              otherButtonTitles:[NSArray arrayWithObjects:@"First", @"Second", nil]
                      onDismiss:^(int buttonIndex)
 {
     NSLog(@"%d", buttonIndex);
 }
 onCancel:^()
 {
     NSLog(@"Cancelled");
 }
 ] show];
Вы можете найти дополнительную информацию в этом руководстве: http://blog.mugunthkumar.com/coding/ios-code-block-based-uialertview-and-uiactionsheet
Еще немного разъяснений,
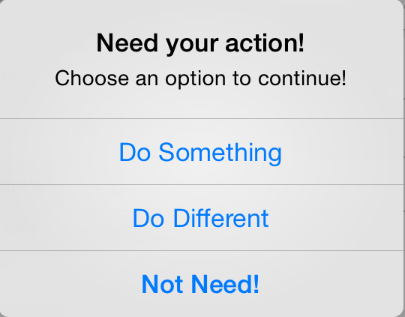
- (void)alertView:(UIAlertView *)alertView clickedButtonAtIndex:(NSInteger)buttonIndex
    {
       //handles title you've added for cancelButtonTitle
        if(buttonIndex == [alertView cancelButtonIndex]) {
            //do stuff
        }else{
           //handles titles you've added for otherButtonTitles
            if(buttonIndex == 1) {
                // do something else
            }
            else if(buttonIndex == 2) {
                // do different thing
            }
        }
    }
Пример,
UIAlertView *alert = [[UIAlertView alloc] initWithTitle:@"Need your action!"
message:@"Choose an option to continue!" delegate:self cancelButtonTitle:@"Not Need!"
otherButtonTitles:@"Do Something", @"Do Different", nil];
[alert show];
(это скриншот iOS7)
Из iOS8 Apple предоставляет новый класс
UIAlertController, который вы можете использовать вместо UIAlertView, который теперь устарел, его также указано в сообщении об амортизацииUIAlertView устарел. Используйте UIAlertController с предпочтительным стилем из UIAlertControllerStyleAlert вместо
Поэтому вы должны использовать что-то вроде этого
Цель C
UIAlertController * alert = [UIAlertController
                alertControllerWithTitle:@"Title"
                                 message:@"Message"
                          preferredStyle:UIAlertControllerStyleAlert];

   UIAlertAction* yesButton = [UIAlertAction
                        actionWithTitle:@"Yes, please"
                                  style:UIAlertActionStyleDefault
                                handler:^(UIAlertAction * action) {
                                    //Handle your yes please button action here
                                }];

   UIAlertAction* noButton = [UIAlertAction
                            actionWithTitle:@"No, thanks"
                                      style:UIAlertActionStyleDefault
                                    handler:^(UIAlertAction * action) {
                                       //Handle no, thanks button
                                    }];

   [alert addAction:yesButton];
   [alert addAction:noButton];

   [self presentViewController:alert animated:YES completion:nil];
Swift
Самый быстрый способ-использовать новый UIAlertController и закрытие:
    // Create the alert controller
    let alertController = UIAlertController(title: "Title", message: "Message", preferredStyle: .Alert)

    // Create the actions
    let okAction = UIAlertAction(title: "OK", style: UIAlertActionStyle.Default) {
        UIAlertAction in
        NSLog("OK Pressed")
    }
    let cancelAction = UIAlertAction(title: "Cancel", style: UIAlertActionStyle.Cancel) {
        UIAlertAction in
        NSLog("Cancel Pressed")
    }

    // Add the actions
    alertController.addAction(okAction)
    alertController.addAction(cancelAction)

    // Present the controller
    self.presentViewController(alertController, animated: true, completion: nil)