CollapsingToolbarLayout и плавающая кнопка действия положение внутри CollapsingToolbarLayout
Я имею в виду Приложение Cheesesquare. на данный момент у меня несколько иное требование к дизайну..
Что-то вроде этого (игнорируйте часть ниже изображения и имени)
Я хочу плавающую кнопку действия в правом нижнем углу кругового изображения и имя человека под ним (который будет CollapsingToolbarLayout title).
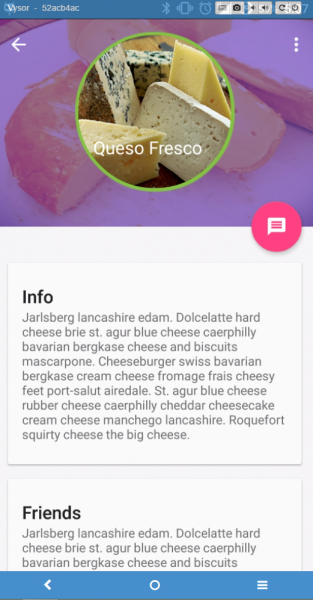
Пока что я в состоянии достичь этого -
Проблема в этой компоновке заключается в том, что я не являюсь способен опустить заголовок ниже изображения, и я не могу переместить плавающую кнопку действия..
Это макет, который я использую (слегка модифицированный из приложения cheesesquare)
<android.support.design.widget.CoordinatorLayout xmlns:android="http://schemas.android.com/apk/res/android"
xmlns:app="http://schemas.android.com/apk/res-auto"
xmlns:custom="http://schemas.android.com/apk/res-auto"
android:id="@+id/main_content"
android:layout_width="match_parent"
android:layout_height="match_parent"
android:fitsSystemWindows="true">

<android.support.design.widget.AppBarLayout
    android:id="@+id/appbar"
    android:layout_width="match_parent"
    android:layout_height="@dimen/detail_backdrop_height"
    android:theme="@style/ThemeOverlay.AppCompat.Dark.ActionBar"
    android:fitsSystemWindows="true">

    <android.support.design.widget.CollapsingToolbarLayout
        android:id="@+id/collapsing_toolbar"
        android:layout_width="match_parent"
        android:layout_height="match_parent"
        android:gravity="bottom"
        app:layout_scrollFlags="scroll|exitUntilCollapsed"
        android:fitsSystemWindows="true"
        app:contentScrim="?attr/colorPrimary"
        app:expandedTitleMarginStart="48dp"
        app:expandedTitleTextAppearance="@style/HeaderTitleStyle"
        app:expandedTitleMarginEnd="64dp">


      <FrameLayout
                    android:layout_width="match_parent"
                    android:layout_height="wrap_content"
                    app:layout_collapseMode="parallax"
                    android:fitsSystemWindows="true">

          <ImageView
              android:layout_width="match_parent"
              android:layout_height="match_parent"
              android:id="@+id/imgProfileUserImage"
              android:adjustViewBounds="true"
              android:scaleType="fitXY"
              android:src="@drawable/cheese_1"
              android:alpha="0.35" />


        <Cheesesquare.Utils.CircleImageView
                android:layout_width="180dp"
                android:layout_height="180.0dp"
                android:id="@+id/imgProfileCircleImage"
                android:src="@drawable/cheese_2"
                custom:border="true"
                custom:border_color="#d5d5d5"
                custom:border_width="4dp"
                custom:shadow="true"
                android:layout_gravity="center"
                android:minHeight="80dp"
                android:minWidth="80dp" />


      </FrameLayout>


        <android.support.v7.widget.Toolbar
            android:id="@+id/toolbar"
            android:layout_width="match_parent"
            android:layout_height="?attr/actionBarSize"
            app:popupTheme="@style/ThemeOverlay.AppCompat.Light"
            app:layout_collapseMode="pin" />

    </android.support.design.widget.CollapsingToolbarLayout>

</android.support.design.widget.AppBarLayout>

<android.support.v4.widget.NestedScrollView
    android:layout_width="match_parent"
    android:layout_height="match_parent"
    app:layout_behavior="@string/appbar_scrolling_view_behavior">

    <LinearLayout
        android:layout_width="match_parent"
        android:layout_height="match_parent"
        android:orientation="vertical"
        android:paddingTop="24dp">

        <android.support.v7.widget.CardView
            android:layout_width="match_parent"
            android:layout_height="wrap_content"
            android:layout_margin="@dimen/card_margin">

            <LinearLayout
                style="@style/Widget.CardContent"
                android:layout_width="match_parent"
                android:layout_height="wrap_content">

                <TextView
                    android:layout_width="match_parent"
                    android:layout_height="wrap_content"
                    android:text="Info"
                    android:textAppearance="@style/TextAppearance.AppCompat.Title" />

                <TextView
                    android:layout_width="match_parent"
                    android:layout_height="wrap_content"
                    android:text="@string/cheese_ipsum" />

            </LinearLayout>

        </android.support.v7.widget.CardView>

        <android.support.v7.widget.CardView
            android:layout_width="match_parent"
            android:layout_height="wrap_content"
            android:layout_marginBottom="@dimen/card_margin"
            android:layout_marginLeft="@dimen/card_margin"
            android:layout_marginRight="@dimen/card_margin">

            <LinearLayout
                style="@style/Widget.CardContent"
                android:layout_width="match_parent"
                android:layout_height="wrap_content">

                <TextView
                    android:layout_width="match_parent"
                    android:layout_height="wrap_content"
                    android:text="Friends"
                    android:textAppearance="@style/TextAppearance.AppCompat.Title" />

                <TextView
                    android:layout_width="match_parent"
                    android:layout_height="wrap_content"
                    android:text="@string/cheese_ipsum" />

            </LinearLayout>

        </android.support.v7.widget.CardView>

        <android.support.v7.widget.CardView
            android:layout_width="match_parent"
            android:layout_height="wrap_content"
            android:layout_marginBottom="@dimen/card_margin"
            android:layout_marginLeft="@dimen/card_margin"
            android:layout_marginRight="@dimen/card_margin">

            <LinearLayout
                style="@style/Widget.CardContent"
                android:layout_width="match_parent"
                android:layout_height="wrap_content">

                <TextView
                    android:layout_width="match_parent"
                    android:layout_height="wrap_content"
                    android:text="Related"
                    android:textAppearance="@style/TextAppearance.AppCompat.Title" />

                <TextView
                    android:layout_width="match_parent"
                    android:layout_height="wrap_content"
                    android:text="@string/cheese_ipsum" />

            </LinearLayout>

        </android.support.v7.widget.CardView>

    </LinearLayout>

</android.support.v4.widget.NestedScrollView>

        <android.support.design.widget.FloatingActionButton
              android:layout_height="wrap_content"
              android:id="@+id/uploadPhotoButton"
              android:layout_width="wrap_content"
              app:layout_anchor="@id/appbar"
              app:layout_anchorGravity="bottom|right|end"
              android:src="@drawable/ic_discuss"
              android:layout_margin="@dimen/fab_margin"
              android:clickable="true"/>
Небольшая помощь была бы признательна : -)
обновление
- мне удалось центрировать текст и сделать его похожим на требуемый пользовательский интерфейс.. Единственное, что остается, это установить круговое изображение в качестве якоря FAB, а затем заставить его исчезнуть как можно скорее как Коллапсирующий Tool Barlayout уходит..
2 ответа:
Вопрос 1. скрыть привязанный вид при сворачивании связанного вида.
Насколько я заметил, якорный атрибут действительно оказывает какое-то странное влияние на возможность вида быть скрытым при сворачивании. Поэтому хорошо проверенное решение состоит в том, чтобы выполнить его программно:appBarLayout.addOnOffsetChangedListener(new AppBarLayout.OnOffsetChangedListener() { @Override public void onOffsetChanged(AppBarLayout appBarLayout, int verticalOffset) { /** * verticalOffset changes in diapason * from 0 - appBar is fully unwrapped * to -appBarLayout's height - appBar is totally collapsed * so in example we hide FAB when user folds half of the appBarLayout */ if (appBarLayout.getHeight() / 2 < -verticalOffset) { fab.setVisibility(View.GONE); } else { fab.setVisibility(View.VISIBLE); } } });Вопрос 2. Как привязать вид непосредственно к границе изображения круга.
К сожалению, "CircleView" - это обычный вид с обычной прямоугольной формой. Вы можете легко проверить это с помощью установка его фонового параметра. Таким образом, в вашем случае FAB привязан к углу вида, но не к точке на круговой границе. Я могу предложить следующее решение:
- поместите FAB в макет оболочки
- применить к этой оболочке атрибуты, относящиеся к правилам привязки (и удалить эти атрибуты из FAB)
- исправьте положение FAB, установив прокладку макета. Значение для заполнения равно (0.2928 * CircleImage.ширина)
Здесь мы используем компоновка оболочки во избежание возможных проблем с перемещением привязанного вида через ее поля.
Значение 0.2928-это коэффициент для вычисления расстояния от угла квадрата до ближайшей точки вписанного в него круга.После всего этого волшебный FAB должен превратиться во что-то вроде этого (предположим, что мы привязываем FAB к изображению круга шириной == 180dp, как в вопросе):
<FrameLayout
    android:layout_width="wrap_content"
    android:layout_height="wrap_content"
    android:paddingBottom="53dp"
    android:paddingRight="53dp"
    app:layout_anchor="@+id/imgProfileCircleImage"
    app:layout_anchorGravity="bottom|right">

    <android.support.design.widget.FloatingActionButton
        android:id="@+id/uploadPhotoButton"
        android:layout_width="wrap_content"
        android:layout_height="wrap_content"
        android:clickable="true"
        android:src="@drawable/ic_discuss" />
</FrameLayout>
Отредактировано
Второе решение может быть улучшено чтобы избежать ручного расчета прокладок. Нам просто нужен пользовательский макет, который может выполнять их сам:
public class CustomFrameLayout extends FrameLayout {
    public CustomFrameLayout(Context context) {
        super(context);
    }

    public CustomFrameLayout(Context context, AttributeSet attrs) {
        super(context, attrs);
        setupPaddings(context, attrs);
    }

    public CustomFrameLayout(Context context, AttributeSet attrs, int defStyleAttr) {
        super(context, attrs, defStyleAttr);
        setupPaddings(context, attrs);
    }

    private void setupPaddings(Context context, AttributeSet attrs) {
        int diameter = 0;
        TypedArray attrArray = context.getTheme().obtainStyledAttributes(
                attrs,
                R.styleable.FabLayout,
                0, 0);
        try {
            diameter = attrArray.getInteger(R.styleable.FabLayout_anchor_diameter, 0);
        } finally {
            attrArray.recycle();
        }

        int padding = (int) Math.round((double) diameter * (1d - 1d / (Math.sqrt(2d)))); // in dips
        int paddingPx = Math.round(TypedValue.applyDimension(TypedValue.COMPLEX_UNIT_DIP, padding, getResources().getDisplayMetrics()));

        String xmlAnchorGravity = attrs.getAttributeValue("http://schemas.android.com/apk/res-auto", "layout_anchorGravity");
        int gravity = Integer.parseInt(xmlAnchorGravity.substring(2), 16);

        int top = ((gravity & 0x30) == 0x30) ? 1 : 0;
        int bottom = ((gravity & 0x50) == 0x50) ? 1 : 0;
        int left = ((gravity & 0x03) == 0x03) ? 1 : 0;
        int right = ((gravity & 0x05) == 0x05) ? 1 : 0;

        setPadding(left * paddingPx,
                top * paddingPx,
                right * paddingPx,
                bottom * paddingPx);
    }
}
И объявить дополнительный атрибут для него в declare-styleable:
<declare-styleable name="FabLayout">
    <attr name="anchor_diameter" format="integer" />
</declare-styleable>
И после этого мы можем заменить это:
<FrameLayout
    android:layout_width="wrap_content"
    android:layout_height="wrap_content"
    android:paddingBottom="53dp"
    android:paddingRight="53dp"
    ...
С более подходящей формой:
<com.example.CustomFrameLayout
    android:layout_width="wrap_content"
    android:layout_height="wrap_content"
    app:anchor_diameter="180"
    ...
Проблема, с которой вы столкнулись, заключается в том, что CircleImageView-это круг внутри квадратного прямоугольника, когда вы устанавливаете FAB для привязки к CircleImageView, он привязывается к углу ограничивающего прямоугольника, а не к самому фактическому ImageView.
Обычно это можно исправить, добавив поля справа и снизу, чтобы переместить FAB в нужное положение, но, похоже, в библиотеке поддержки проектирования есть ошибка, из-за которой поля игнорируются.
Вот еще один так что вопрос обсуждаем его дальнейший.
Вот проблема, которая была зарегистрирована в Google.
Проблема была назначена кому-то из команды Android, поэтому, надеюсь, она будет исправлена в более позднем выпуске.


